HtmlLessons
Teaching HTML, the right way.
Navigation ☰
History
Origin of HTML
The man's name is Tim Berners-Lee and he was a scientist who was contracted for an organization called CERN back in the late 1980s.
CERN had researchers from all over the world, each of whom used their own operating system and file formats when they would create documents. This made it very difficult to share research, often times it would be easier to print and distribute the files manually. Born out of this frustration of sharing documents, Tim Berners-Lee created HTML and more broadly shaped how we interact with the web today.
Evolution
In 1991, the very first document was published describing HTML tags. These tags were simple and were developed within the context of essentially sharing scientific (i.e., boring) documents.
The 1990s were the absolute wild west of websites. The world wide web completely took off and started gaining widespread adoption. This had the side effect of different companies implementing their own versions of HTML to address the needs that popped up when people started building websites that weren't just plain documents.
While you might be aware of different browsers today like Chrome and FireFox, their differences are almost meaningless when compared to how drastically different browsers were during this time.
The first attempt to reign in the insanity of the 1990s came in the early 2000s with the implementation of XHTML. Without getting too technical, this attempt was to make HTML more extensible and compatible with XML tools. While it never really gained widespread adoption, it did plant the seed that something needed to be done to standardize HTML.
Then, starting in 2008 and finished in 2014, a fully standardized version of HTML called HTML5 was defined. We can thank the good people of the W3C for giving us a solid language that we can work with today.
Mindset
The reason I go into the history of HTML is to try and give you context of how this language works and why it was built.
Technically speaking, HTML is not a programming language, rather it is a markup language. All that is done when you write HTML is that the browser reads the document and then displays the formatted text.
While you're learning HTML, keep in the back of your mind that this language was originally developed to provide an universal mechanism to create and format scientific documents.
Documents
Parts
Remember how in the "History" lesson I explained that HTML was born out of the context of sharing scientific research? Well, whenever you create a file with the .html or lesser used .htm extension, this is referred to as a document.
Documents are made up of 4 main parts:
- Document type
- Specifies which version of HTML is being used
- HTML Element
- The object that contains the HTML
- Head element
- Lives "inside" the HTML element and must be the first child element.
- Holds information about the document.
- Body element
- Also lives "inside" the HTML element and must follow the head element.
- Holds the content displayed inside of the browser.
Elements
It is important to know that HTML uses "elements", also known as "tags", to markup the document. For example:
<my-element>Content</my-element>In this example, we have an element named my-element and store some content inside the tags. Notice that there are two tags, an opening and closing tag. Both start and end with the less than and greater than symbols, but the closing tag has a forward slash before the element's name.
The previous example is considered a non-self closing element. This is because it contains the opening and closing tags.
Some elements allow for just one tag where the forward slash appears as the end of the element, like this:
<my-element />These elements are self closing elements. These types of elements cannot contain content and there are only a few elements which allow this.
Something to note is that self closing elements do not strictly need the forward slash at the end. However, in these lessons, I will only ever use self closing elements with the forward slash. The reason behind this decision is subjective, but I believe that it is best to be as explicit as possible when writing HTML.
Another subjective rule that I will be following throughout these lessons is that I will only use lowercase element names. While HTML is case-insensitive when it comes to element names, it is common practice to stick with lowercase.
Document Type
Document type is a special element that doesn't conform to the rules (or subjectivity) outlined above. Instead, it looks like this:
<!DOCTYPE html>The document type element is a declaration that tells the browser what version of HTML is being used. This is one of the few elements that are actually required and it must appear at the very top of your document before any other code.
The latest version of HTML only requires the document type shown above, however here are some other versions should you ever need to use them:
- HTML 4 Strict
-
<!DOCTYPE HTML PUBLIC "-//W3C//DTD HTML 4.01 Strict//EN" "http://www.w3.org/TR/html4/strict.dtd">
-
- HTML 4 Transitional
-
<!DOCTYPE HTML PUBLIC "-//W3C//DTD HTML 4.01 Transitional//EN" "http://www.w3.org/TR/html4/loose.dtd">
-
- HTML 4 Frameset
-
<!DOCTYPE HTML PUBLIC "-//W3C//DTD HTML 4.01 Frameset//EN" "http://www.w3.org/TR/html4/frameset.dtd">
-
- XHTML 1.1
-
<!DOCTYPE html PUBLIC "-//W3C//DTD XHTML 1.1//EN" "http://www.w3.org/TR/xhtml11/DTD/xhtml11.dtd">
-
- XHTML 1.0 Strict
-
<!DOCTYPE html PUBLIC "-//W3C//DTD XHTML 1.0 Strict//EN" "http://www.w3.org/TR/xhtml1/DTD/xhtml1-strict.dtd">
-
- XHTML 1.0 Transitional
-
<!DOCTYPE html PUBLIC "-//W3C//DTD XHTML 1.0 Transitional//EN" "http://www.w3.org/TR/xhtml1/DTD/xhtml1-transitional.dtd">
-
- XHTML 1.0 Frameset
-
<!DOCTYPE html PUBLIC "-//W3C//DTD XHTML 1.0 Frameset//EN" "http://www.w3.org/TR/xhtml1/DTD/xhtml1-frameset.dtd">
-
Older versions of HTML may have their own document type declaration, but these were developed in the wild west of the 1990s and most likely browser dependent. It would be impractical to try and list them all.
Html Element
The html element is the root element that contains the whole document.
HTML is a markup language and one of the characteristics of most markup languages is that they are typically hierarchical. It is common to see structures like this in various markup langauges:
- root
- first child
- first grand child - first overall
- second grand child - second overall
- second child
- first grand child - third overall
- second grand child - fourth overall
- first child
With HTML, the html element is the root, also known as top-most, element.
Here is an example of the html element:
<html lang="en"></html>Attributes
Notice that inside the opening tag of the example above that we have values inside the tag itself. These key/value pairs that appear in the tag itself are called attributes.
Attributes and their values are not considered to be the "contents" of an element, rather they are used to give properties to a specific element.
Attribute names must consist of one or more alphanumerical characters along with most special characters. A typical naming convention is to use "slug" casing, e.g.:
<my-element slug="value" multiple-word-attribute="foo"></my-element>There should not be duplicate attributes, but HTML is very forgiving and will not throw an error if there are. However, you may find that your code doesn't behave like you expect it to, so it is best practice to never use duplicate attributes.
I have one last note on the lang attribute before moving on. The attribute itself is optional, however highly encouraged. Keep in mind that while most people can read just fine, there are those who must rely onscreen readers and other assistive technologies. Without the lang attribute, these assistive technologies may mispronounce words or straight up fail.
The lang attribute and many other attributes are very low effort ways that developers can give users with disabilities a more robust experience when visiting web pages you create.
Head Element
The head element provides metadata about the HTML document and allows us to reference other code files. Metadata is basically data that describes data. It may or may not have any relevance to the content that gets rendered in the browser, but the data defined in the head element is definitely used by something, typically the browser itself or SEO tools.
There are many elements that could live in the head element, but one required element is the title. While the file may have a filename, the title is what gives the HTML document its "name" so to speak. The title is also displayed in the browser, typically in the tab header.
Here is a bare minimal example of setting up the head element:
<!DOCTYPE html>
<html lang="en">
    <head>
        <title>My Document</title>
    </head>
</html>
Don't freak out just yet, there will be plenty of time to do that when you become a software developer. I go into more detail for these concepts in later lessons, the examples here are really just to give you an idea of what to expect.
Body Element
The body element contains the actual content that is displayed in the browser.
Technically, because HTML is so forgiving, you do not need to use any elements inside the body and you could use just plaintext. However, it is typically best practice to wrap even plaintext into their own elements.
Here is a bare minimal example of setting up the body element:
<!DOCTYPE html>
<html lang="en">
    <head>
        <title>My Document</title>
    </head>
    <body>
        <p>Hello world!</p>
    </body>
</html>
The Forgiving Language
You may read me say that HTML is a forgiving language throughout these lessons, and that's because it truly is. You can get away with writing a bunch of bad code because HTML and the browser rendering it will typically do everything in their power to not throw errors.
This is both good and bad. Its good because when you're learning or trying to get something to just "work" then you can get away with a lot. But it's bad because it's very easy to get unintended side effects with some HTML code and can be just as hard to track down.
Just to prove a point, this is valid HTML and a browser will render it just fine:
<!DOCTYPE html>
<title>My Document</title>
<p>Hello world!
Please don't do this. Take the effort to write clean and good performing code. You will thank yourself in the long run.
Questions
Question 1
Question 2
Question 3
Comments
What Are They?
Comments allow you to write text that the browser will ignore.
Comments have many use cases. Some use cases are:
- Indicate who wrote a piece of code
- Explain what a block of code does in plain English
- Indicate where a section starts and stops
Comments can appear anywhere in the code, but not inside HTML tags themselves, and are simple enough to use.
They are similar to the DOCTYPE declaration in that they are special instructions that don't behave like normal elements. Unlike normal elements, a comment doesn't have a name. Instead, it uses two dashes, like this:
<!-- Hello world! I'm a comment -->Comments can even stretch across multiple lines:
<!--
     Hello world!
     I'm a comment
     Spread across many lines
-->
A Word To The Wise
Be careful with comments! Because HTML has no compilation step, anyone can view your code straight from the browser. Just because a comment containing sensitive information wouldn't render in the browser (e.g., passwords, API keys, or private notes), savvy users can still see it.
For example, this would be a big no no:
<!-- TODO: production password is Abc123! -->Debugging
What Is It?
Because HTML is a markup language and not a programming language, it doesn't "run" in the same way that code like Visual Basic, JavaScript, or Python do. This means you won't see error messages when something goes wrong. Instead, you'll usually notice that your page looks like crap.
Some common signs of HTML errors include:
- Text or elements not appearing where you thought they would
- Images not loading
- Broken links
- Layout looks off
Here are some practical techniques for debugging your HTML:
- Check your tags:
- Make sure every non-self closing elements have an opening tag has a closing tag.
- Make sure every attribute has an opening and closing double-quote.
- Validate your code:
- Use a validator such as the W3C Markup Validation Service (opens in a new tab) to catch common mistakes.
- Watch for typos:
- Text programs that provide autocomplete are super helpful, but I can't tell you the number of times it autocompleted the wrong thing for me.
- I thought I had a closing "pre" tag it turned out I had a closing "p" tag instead because the autocompletion thought that's what I needed.
Browser's Developer Tools
Almost every browser today includes some sort of developer tools that let you inspect the code running on that page. You can usually open them by right-clicking anywhere on the page and selecting Inspect (or pressing F12 on your keyboard).
Nearly all have this cool little feature that allow you to select an element in the page to inspect it. This is super helpful because you can point and click on an element to find it in the document code viewer.
Most browsers even have a device emulation tool that allow you to emulate other devices. This is extremely helpful when working on mobile apps, because you can develop from your 4K monitor and then scale down to what a Nokia is running (if you got that joke, how are your knees doing?).
Something that most modern browsers allow you to toggle is light/dark mode preference. For instance, the CSS library I'm using (which makes the website look pretty) provides a light and dark mode based on the user's preference. While I was building this site I toggled between both modes to see how the content would look depending on the user's configuration.
Rather than trying to list the features of every browser's developer tools, I would recommend searching the official documentation for your browser to see what it has to offer.
Try inspecting this page and viewing some of the elements in how I've got them structured. You can see code perfection in action.
My 2¢
HTML debugging is less about fixing "bugs" in the traditional sense and more about carefully checking your work for small mistakes.
When debugging, start small. If you're not sure where a problem is coming from, strip your page down to the simplest version that still has the issue. You can build things back up until it breaks again. Once it breaks, then you've found your problem.
For example, forgetting to close a layout element can cause entire sections of a page to behave strangely. Removing extra code can help you spot the missing piece:
<div>
  <p>This is fine.</p>
  <p>Oh no, why is the formatting after this all messed up?</p>
  <!-- Missing </div> here! -->
<div>
  <p>😔</p>
</div>
Opening Files
Eventually when you go to publish websites, you will need to setup a server, DNS registration, etc., but we won't be covering that because these lessons are designed for the beginner in mind.
While you're writing HTML on your personal computer, there are several ways to view the results.
From Browser
Probably the easiest method is to open the file directly from the web browser.
This can be done by either double-clicking the file from your file explorer and letting the operating system open it for you -or- by:
- Opening your web browser
- Using the shortcut key Ctrl+O -or- going to File > Open
- Selecting the .html -or- .htm file you want to open.
From IDE
If you are using an IDE like Visual Studio Code, which I highly recommend by the way, then there are some tools that you can use to preview the code.
When an HTML file is opened in Visual Studio Code, there is a little preview icon in the top-right corner. Clicking on the preview icon will open a side tab that shows a live preview of the document.
Head Element
Description
The head element is one of those parts of an HTML document that you don't actually see in the browser, but it's quietly doing a ton of heavy lifting behind the scenes. If the body element is the content your visitors interact with, then the head is more like the backstage crew making sure the show even runs.
Back in the Documents lesson I showed you a bare minimum example with just a title. That's technically valid, but in the real world you're almost always going to see more stuff living in the head.
Common Elements
What's going on in your head? You definitely don't want to know what's going on in mine. But if you're curious, you can always right-click anywhere in this page and select View Page Source.
Some common things you'll find in the head element include:
- Title - Required. Shows up in the browser tab and when people bookmark your page.
- Character set - Tells the browser what text encoding to use so your content doesn't turn into gibberish when you add special characters or emojis.
- Viewport - Helps mobile browsers scale your page properly.
- Metadata - Stuff like descriptions for search engines, or preview info when your link gets shared on social media.
- Links to other files - Stylesheets, icons (favicons), or fonts that your page depends on.
Example
Here's a more fleshed-out version of a head element you might actually use:
<!DOCTYPE html>
<html lang="en">
  <head>
    <title>HtmlLessons</title>
    <meta charset="UTF-8" />
    <meta name="description" content="Teaching HTML, the right way." />
    <meta name="author" content="David Day." />
    <meta name="viewport" content="width=device-width, initial-scale=1.0" />
    <link rel="stylesheet" href="styles.css" />
    <link rel="icon" href="favicon.ico" type="image/x-icon" />
  </head>
  <body>
    <p>Hello world!</p>
  </body>
</html>
Wrapping It Up
The head element isn't the star of the show that makes every day users love your website, but if you skip over it, your users probably won't understand why some of the little things don't work like they expect it would.
Title
Description
The title element is the one thing the head element requires. Without it, your document technically still works because HTML is a very forgiving language, but it would be like missing its name tag at a convention.
Whatever you put inside the title will show up in a few important places:
- In the browser tab.
- In bookmarks.
- In search engine results.
Here is a simple example:
<!DOCTYPE html>
<html lang="en">
  <head>
    <title>My Website</title> <!-- title -->
  </head>
  <body>
    <p>Hello world!</p>
  </body>
</html>
Good vs. Bad
If you don't set a title, many browsers will display "Untitled Document." That's about as helpful as a file on your computer named "New Text Document (7).txt."
Compare these:
<!-- imagine having 5 opened tabs, all named "Page 1" -->
<title>Page 1</title>

<!-- versus this -->
<title>Tarte A La Boullie Recipe</title>
Writing Simpler
Don't overthink titles, but also don't be lazy with them. Write them like you're labeling a folder you'll want to find later. Future you (and your users) will thank you.
I previously worked with a brilliant man who preached that you should write what you have to say, but not a word more. This is absolutely true when giving documents titles, they should be as clear and concise as possible.
Character Set (aka charset)
Description
The meta charset element tells the browser what set of characters to expect in your document. Without it, your text might still display fine and everything looks good. That is until you try to throw in something like an emoji, a non-English word, or even a fancy quotation mark. Then things can go sideways fast.
Here's how you usually see it written:
<!DOCTYPE html>
<html lang="en">
  <head>
    <title>Charset Example</title>
    <meta charset="UTF-8" /> <!-- UTF-8 charset -->
  </head>
  <body>
    <p>Hello world! 😎</p>
    <p>Skibbity rizz or something</p>
    <p>ヾ(⌐■_■)ノ</p>
  </body>
</html>
Why UTF-8?
UTF-8 is the most common and widely supported character set on the web. It covers English letters, accented characters (like in café), symbols (© ® ™), and yes, even emojis (🥳). Unless you have a very niche reason to use another charset, just stick with UTF-8.
Missing Charset
If you leave out the charset, your browser will try to guess what to show. Sometimes it guesses right, but sometimes it turns text into random gibberish. For example, an emoji could show up as a little empty box (□) or a question mark (�).
The charset is one of those small things that you can do to give users a consistent experience, regardless of if they're using assistive technology or not.
Viewport
Description
The viewport meta tag tells browsers how to size and scale your page.
Back when the web was mostly viewed on desktop monitors, this was a non issue. But today we use HTML on phones, tablets, laptops, and 84 inch TVs and your page has to work on all of them.
Here's the most common viewport setup you'll see:
<!DOCTYPE html>
<html lang="en">
  <head>
    <title>Viewport Example</title>
    <meta charset="UTF-8" />
    <meta name="viewport" content="width=device-width, initial-scale=1.0" /> <!-- typical viewport -->
  </head>
  <body>
    <p>Hello world!</p>
  </body>
</html>
Breaking It Down
- width=device-width
- This tells the browser: "pretend the screen is the same width as the device itself."
- Without this, some mobile browsers shrink your page down to fit a full desktop layout, which usually makes everything look tiny.
- initial-scale=1.0
- This sets the zoom level when the page first loads.
- A value of 1.0 tells the browser to show it at "normal" size.
What Happens Without It?
On a desktop, you probably won't notice much difference if any at all. But open the same page on a phone and suddenly you'll feel like you need a magnifying glass. The text will look microscopic, and users will have to pinch and zoom just to read your content.
I have personally left webpages because they didn't bother to set the viewport and it made it inconvenient to use their website.
Just Do It!
Always include the viewport tag, even if you're just starting out and your page is a single "Hello World".
It's one of those things that you don't appreciate until you forget it and then all of a sudden your website looks like it was built in 2003. Put it in every project, no excuses or the Rougarou will get you.
Meta Tags
Description
Meta tags can provide extra information about your page. Two of the simplest and most common are the description and author tags, but there are roughly 50 million more.
Meta tags won't change how your page looks, but they do show up in places like search engine results and browser tools.
Here is an example:
<!DOCTYPE html>
<html lang="en">
  <head>
    <title>Meta Tags Example</title>
    <meta charset="UTF-8" />
    <meta name="description" content="Teaching HTML, the right way." /> <!-- description -->
    <meta name="author" content="David Day." /> <!-- author -->
    <meta name="viewport" content="width=device-width, initial-scale=1.0" />
  </head>
  <body>
    <p>Hello world!</p>
  </body>
</html>
Why Description Matters
The description is often used by search engines as the short blurb that appears under your page title in search results.
Think of this as your elevator pitch, so keep it concise, typically under 160 characters.
Why Author Matters
They don't really. Unless you're like me with a pretty big ego in which case its the absolute most important meta tag because it allows us to say who wrote the code.
In reality it won't change much, but it can show up in developer tools and be used by certain software.
The Opera Winfrey Effect
You get a meta tag! You get a meta tag! You all get a meta tag!
There are so many different meta tags, it is absolutely ridiculous. I do not think that there is even a complete list of meta tags out there, but if you're a masochist and want to go look at a decent enough list then I'd recommend checking out this GitHub repository (opens in a new tab).
Favicons
Description
A favicon is the little icon you see in the browser's tab next to the page's title. Without setting a favicon, your site will show a "blank page" icon which can be different between browsers.
Here is an example:
<!DOCTYPE html>
<html lang="en">
  <head>
    <title>Favicon Example</title>
    <meta charset="UTF-8" />
    <meta name="description" content="Teaching HTML, the right way." />
    <meta name="author" content="David Day." />
    <meta name="viewport" content="width=device-width, initial-scale=1.0" />
    <link rel="icon" href="favicon.ico" type="image/x-icon" /> <!-- icon file -->
  </head>
  <body>
    <p>Hello world!</p>
  </body>
</html>
File Location
In the example above, the favicon.ico file would need to live in the same directory as the .html file.
Most servers that serve up the HTML files will respect a typical relative path. So for example, if you have:
<link rel="icon" href="../favicon.ico" type="image/x-icon" />Then you are telling the server to get file in the parent directory of the file that the HTML file lives in. That is because of the two dots before the filename.
File Types
Some browsers will support different file types for favicons, but the following list will probably give you the most support:
- .icon
- .png
- .svg
I really don't have a recommendation on which file type you should use. I will typically use SVG files because of their resizing capabilities.
Size Matters
... at least for favicons. Back in the gap, you could probably get away with having a single 16x16 favicon, but we live in a day and age where we support many different devices with a range of screen resolutions.
Here are some common Favicon sizes that you should support:
- Browser Tabs: 16x16
- Bookmarks: 32x32
- Desktop Taskbar: 48x48
- Tablets: 192x192
You can specify the different sizes by using the sizes attribute:
<!DOCTYPE html>
<html lang="en">
  <head>
    <title>Favicon Example</title>
    <meta charset="UTF-8" />
    <meta name="description" content="Teaching HTML, the right way." />
    <meta name="author" content="David Day." />
    <meta name="viewport" content="width=device-width, initial-scale=1.0" />
    <link rel="icon" href="favicon-16.ico" sizes="16x16" type="image/x-icon" /> <!-- smallest icon -->
    <link rel="icon" href="favicon-32.ico" sizes="32x32" type="image/x-icon" /> <!-- next smallest -->
    <link rel="icon" href="favicon-48.ico" sizes="48x48" type="image/x-icon" /> <!-- medium icon -->
    <link rel="icon" href="favicon-192.ico" sizes="192x192" type="image/x-icon" /> <!-- largest icon -->
    <link rel="icon" href="favicon-any.svg" sizes="any" type="image/x-icon" /> <!-- generic "catch all" -->
  </head>
  <body>
    <p>Hello world!</p>
  </body>
</html>
In this example we have 5 favicon files and then the browser/operating system would know which icon file it should use for the size requirement.
Linking Stylesheets
Description
Right now your HTML page probably looks like plain black text on a white background. To make things look sexy (like this website), you need CSS (Cascading Style Sheets).
This is not a tutorial on how to write CSS, because it is its own markup language with its own rules. Rather, I'm just going to show you how to reference a CSS file from within the head element:
<!DOCTYPE html>
<html lang="en">
  <head>
    <title>Linking Stylesheets Example</title>
    <meta charset="UTF-8" />
    <meta name="description" content="Teaching HTML, the right way." />
    <meta name="author" content="David Day." />
    <meta name="viewport" content="width=device-width, initial-scale=1.0" />
    <link rel="icon" href="favicon.ico" type="image/x-icon" />
    <link rel="stylesheet" href="styles.css" /> <!-- linked stylesheet -->
  </head>
  <body>
    <p>Hello world!</p>
  </body>
</html>
Why Put It In The Head?
There is a specific lifecycle that documents follow when they are loaded in the browser. And because the head element gets loaded before the body element, linking your stylesheet here makes sure your styles are ready to be applied before the content appears.
Stay In Your Lane
Don't worry about learning CSS just yet. That's its own thing. For now, just know that the link tag is the bridge between your HTML and your styles.
I do plan on creating a CSS tutorial series, much like these, but it takes a considerable amount of time to create this content.
End of Chapter Quiz
Questions
Question 1
Question 2
Question 3
Question 4
Question 5
Question 6
Question 7
Question 8
Body Element
Description
The body element holds everything the user actually sees and interacts with in the browser window. This includes text, images, links, forms, tables, and so on.
You can technically omit it and the browser will infer one (remember: HTML is forgiving), but you should always include it because that will make your document easier to read, maintain, and debug.
Rules Of The Road
- Exactly one body per document.
- The body must come after the head.
- All visible content belongs inside it.
- Global attributes such as id, class, lang, and dir can be applied here just like on other elements.
Here is an example of a simple document with the body set:
<!DOCTYPE html>
<html lang="en">
  <head>
    <title>HtmlLessons</title>
    <meta charset="UTF-8" />
  </head>
  <body id="beach-body" class="page black-font pale-background">
    <p>Hello world!</p>
  </body>
</html>
Future Code Examples
From this point forward, I will provide less examples with the entire HTML markup. This is because I will be covering the content that make up the visual elements of HTML and as I have already mentioned previously, all visual elements live inside the body element.
So if you see a code example in the next lessons and it does not contain the DOCTYPE, html, head, or body element, then you can simply assume that the example lives inside the body element.
Identifiers
In the example above, you should see that I have the id and class attributes set on the body. Before moving onto the next section, I wanted to briefly go over these.
If you decide to learn CSS or JavaScript, you will be referencing these attributes quite a bit.
The example has a body where its id is "beach-body" and it has the following classes:
- page
- black-font
- pale-background
Both attributes are optional, but if you are giving an element and id then it should only ever have one. The id should also be unique throughout the entire document. In otherwords, it is wrong to have two elements that have the same id.
For example:
<element id="foo" class="bar">One</element>

<!-- bad because the id already exists -->
<element id="foo" class="lorem">Two</element>

<!-- good because it has a unique id and the class doesn't need to be unique -->
<element id="bar" class="bar">Three</element>
Elements can have multiple classes by giving it a single class attribute and delimitting the class names using a space. Unlike ids, classes do not need to be unique. You can have 50 million elements, all with the same class. Well your browser would probably crash with 50 million elements, but you get the idea.
For example:
<element class="class1 class2 class3 etc">One</element>Headings
Description
Headings communicate the structure of your content. They provide a hierarchy that helps both people and assistive technologies understand what is important on the page.
There are six heading elements, ranging from h1 through h6. Each one represents a different level of importance.
Six Levels
The h1 element is the "largest" element and is meant to represent the broadest topic; 9 times out of 10 this will represent the webpage's title and you'll only have 1.
The h6 element is the "smallest" element and is meant to represent the most narrow topic. For example, if I have a h1 element with the text "Cars" then an h6 element might have something like "LED Lights on Cars Manufactured After 2024"
Headings are not self-closing elements because the text content goes inside the tags:
<h1>My Page</h1>
<h2>Cool Section</h2>
<h3>Subtitle of Section</h3>
<h4>Topic Within Section</h4>
<h5>Subtopic</h5>
<h6>Even Narrower Category</h6>
Heading Styles
Unfortunately, a common practice is for developers to pick a heading element based on how it looks rather than picking the right level for the content.
Please don't do this and instead pick the logic heading element for your content. Later, if you decide to learn CSS, you will be able to style the correct headers to be the desired size.
Demo
Open the demo in a new tab
Paragraphs
Description
Paragraphs are the backbone of text content. Use the p element to group sentences that belong together.
Example
<p>This is a paragraph. It contains 11 words and 2 sentences.</p>
<p class="big-back">This paragraph is shawty.</p>
<p id="big-back">This paragraph is different from the one above it because even though they both have attributes with "big-back", this one has its id set whereas the other has the class set.</p>
Whitespace Rulez d00d!
Not really, whitespace is sort of a pain in the rear.
HTML collapses consecutive spaces and newlines inside most elements (including paragraphs) into a single space. If you need a line break, you have to add it explicitly (covered later).
To demonstrate what I mean, view this page's source (Ctrl+U), find this element (search for you-found-me) and notice how the new lines and tabs get collapsed down to a single space.
Nesting
Paragraphs can contain inline content such as text, links, and formatting elements (covered later) but they cannot contain other block-level elements.
For now, just take my word for it, but we will be covering the elements used in the example below later on.
<!-- valid example -->
<p>This is an <span>inline element</span></p>

<!-- invalid example -->
<p>This is a <div>block element</div></p>
Demo
Open the demo in a new tab
Exercise
By now you should know how to setup a basic HTML document, structure the head, and provide some basic body elements.
I encourage to you do the following exercise. Reference the previous lessons if you need, but I would highly encourage you to type out the code instead of just doing a rote copy/paste.
- Create an HTML file with a document
- The document should have the lang attribute set
- Give the document the title: My First Code
- Set the charset, viewport, and author metatag
- Give it a heading: My First Code
- Give it a subheading: Hello World
- Give it a paragraph with any arbitrary text
Show Exercise Code
<!DOCTYPE html>
<html lang="en">
  <head>
    <title>My First Code</title>
    <meta charset="UTF-8" />
    <meta name="viewport" content="width=device-width, initial-scale=1.0" />
    <meta name="author" content="David Day." />
  </head>
  <body>
    <h1>My First Code</h1>
    <h2>Hello World</h2>
    <p>E lorem ipsum or something like that!</p>
  </body>
</html>
Click on the "Show Exercise Code" above to show the code I used to complete the exercise.
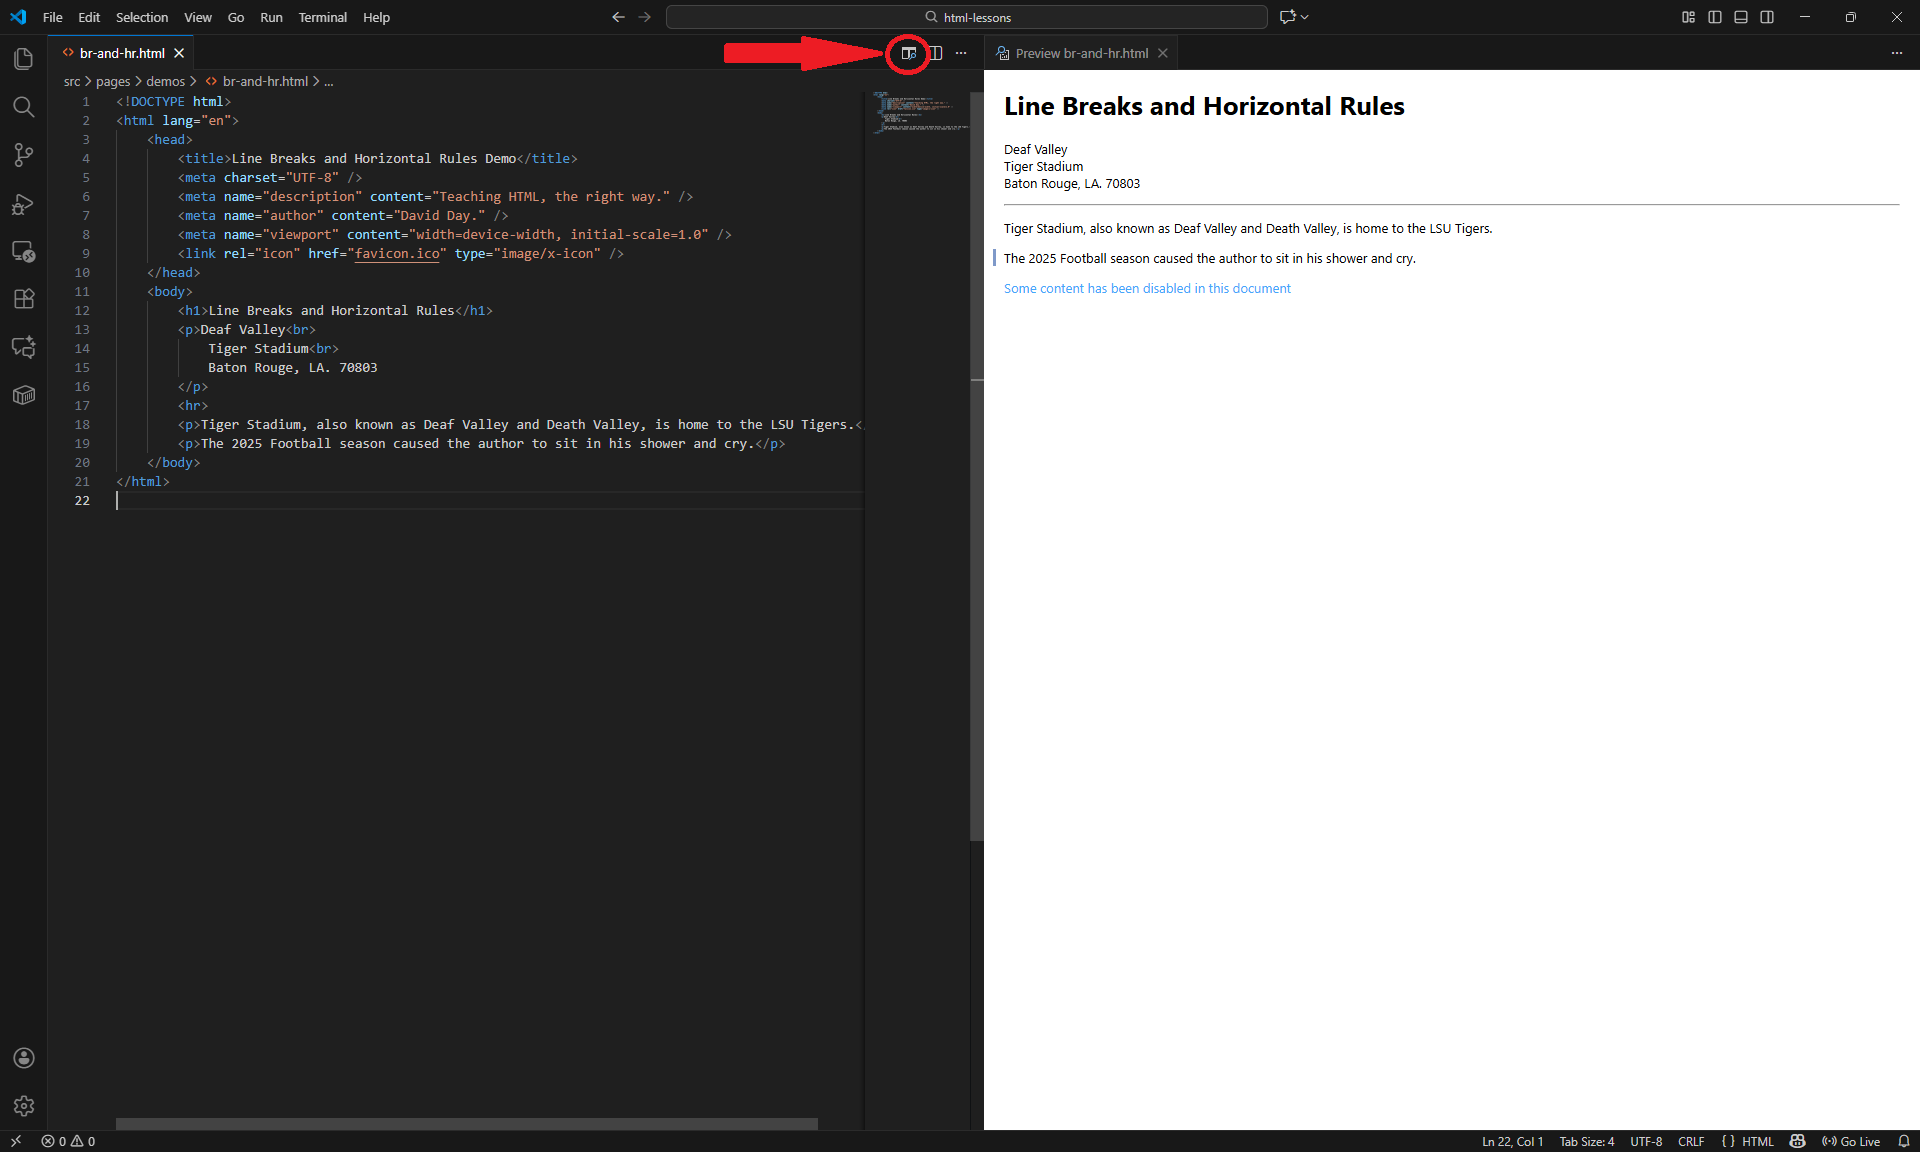
Line Breaks And Horizontal Rules
Description
Sometimes you need a manual line break or a visual divider. That is where the br and hr elements come in.
Both elements are self closing elements because they don't contain any content and both should be used very sparingly.
Layout and spacing should be handled with CSS, but these elements are two of the more useful holdovers from early HTML and still have their use.
Line Breaks
A line break should be used in cases where a new paragraph doesn't really make sense, but you still need text to start on a new line. Since the line break element is an inline element, it can live inside of a paragraph element.
Here is an example of using line breaks in an address:
<p>Deaf Valley<br />
Tiger Stadium<br />
Baton Rouge, LA. 70803</p>
Horizontal Rule
A horizontal rule is essentially a line going across the page.
There is a debate about whether or not horizontal rules should be used at all and if so what their meaning represent. My personal philosophy is that they are used to visually separate contexts.
If you look at many LLMs, many will provide you with a response, followed by a horizontal rule, followed by a follow up. This more or less follows the same approach that I take.
This is an example of using a horizontal rule:
<p>I have a bunch of text representing something.</p>
<p>It keeps going on and on. One sentence after another.</p>
<p>Content related to this section is about to stop and I'm about to move onto the next thing about this page.</p>
<hr />
<p>Now I have started on the next section and there's a visual indicator above this paragraph.</p>
Keep in mind that horizontal rules are block level elements and cannot live inside of inline elements like paragraphs.
Demo
Open the demo in a new tab
Formatting
Description
Formatting elements let you change the meaning or emphasis of text inside your content. While some of them also change how text looks by default, their main purpose is semantic, meaning that they describe the type of content, not just its appearance.
CSS is used to style elements and customize their appearance. Remember that HTML was created to represent really boring documents, not to make them look pretty.
Common Formatting Elements
The following list are some of the more commonly used formatting elements:
- del: Deleted, typically rendered with a strikethrough.
Deleted - em: Emphasis, typically rendered as italics. Emphasis
- ins: Inserted, typically rendered with an underline. Inserted
- mark: Highlighted, typically rendered with a highlighted background. Marked
- small: Fine print, typically rendered as smaller text. Small
- strong: Strong important, typically rendered as bolded text. Strong
- sub: Subscript, typically rendered as small text positioned below the line. Reference 1
- sup: Superscript, typically rendered as small text positioned above the line. 23=8
Note: The formatting elements on this page may look differently than yours. This is because I'm using a CSS library called PicoCSS and they provide out-of-the box styling for formatting elements.
Example
<p>This is <em>important</em> text.</p>
<p>This is <strong>very important</strong> text.</p>
<p>Nothing to see here <small>you agree to pay me one million dollars</small>.</p>
<p>Please see the <mark>highlighted</mark> words for emphasis.</p>
<p>Price: <del>$129.99</del> 10 easy payments of <ins>$29.99</ins>!</p>
<p>Water is represented as H<sub>2</sub>O.</p>
<p>E = mc<sup>2</sup></p>
Inline Text Elements
Description
Inline text elements are used to mark up pieces of text within a line. Unlike block elements (such as paragraphs or headings), inline elements do not start on a new line. They flow with the surrounding content.
We have already dealt with some inline elements, like the line break and the formatting elements in the previous lesson, so you should already be familiar with them.
Common Elements
The following list are some of the more commonly used inline text elements:
- a: Anchor, used for links (covered later). Anchor
- abbr: Abbreviation or acronym, with an optional title attribute. HTML
- cite: Reference to work. Citation
- code: Pretty self explanatory, no?
Code - kbd: User input from a keyboard. CTRL
Note: The inline text elements on this page may look differently than yours. This is because I'm using a CSS library called PicoCSS and they provide out-of-the box styling for inline text elements.
Example
<p><abbr title="Hypertext Markup Language">HTML</abbr> is the markup language that makes up the web.</p>
<p><cite>Atlas Shrugged</cite> is one of my favorite fictional books.</p>
<p>Press <kbd>WIN</kbd> + <kbd>S</kbd> to search on Windows.</p>
Exercise
Description
You have learned a lot at this point, I am very proud! Go ahead and stop the lessons to take a break. I would recommend taking what you have learned and building a practical HTML document.
I do not have any solid requirements for you on this exercise, but what I would recommend is to take a subject and write a paper on it like you would in school. Only instead of using software like Word to format your document, use what you've learned so far. Remember to setup the head properly and to use proper headings.
If you would like for me to review your work, create a new JSFiddle (opens in a new tab) and email me the link it generates when you run your code, just be sure to save the fiddle first so it generates the link. My email can be found on About.
Solution
Show Exercise Code
<!DOCTYPE html>
<html lang="en">
  <head>
    <title>LSU Tigers</title>
    <meta charset="UTF-8" />
    <meta name="viewport" content="width=device-width, initial-scale=1.0" />
    <meta name="author" content="David Day." />
  </head>
  <body>
    <h1>A Brief History of the LSU Tigers Football Team</h1>
	<p>The <strong>LSU Tigers football team</strong> has long stood as one of the central pillars of athletic culture at <em>Louisiana State University</em>, reflecting over a century of growth, transformation, and achievement in American college football.</p>
	<p>Established in the final years of the 19th century, LSU's football program began modestly, shaped by regional enthusiasm for a sport that was still evolving nationally. Early teams played in relatively simple conditions, with limited resources, yet they laid the groundwork for a program that would eventually rise to national prominence.</p>
	<hr />
	<p>A beautiful side note which show cases the blatant corruption of Louisiana politicians, in the early days LSU needed a football stadium but the fiscally tight congressional representatives would not allow it. So when Govenor Huey P. Long was denied his request for a stadium, he countered with a request for dorms, which was granted.</p>
	<br />
	... of course the representatives weren't aware that the governor would then build dorms around a football field shaped lawn and put seating on top of the dorms.
	<hr />
	<p>As the decades progressed, LSU's football identity developed through an expanding fanbase, the construction of improved facilities, and the emergence of distinctive traditions. The growth of <strong>Tiger Stadium</strong>, which started as a small concrete structure, symbolized this evolution. Over time, the stadium became one of the most iconic venues in college sports, celebrated for its atmosphere and crowd intensity.</p>
	<p>By the mid-20th century, LSU began to attract more skilled players and visionary coaches who elevated the team's competitive reputation. Strong defensive play, physical rushing attacks, and passionate support from students and alumni contributed to a style of football that became synonymous with the Tigers. During these years, the program captured meaningful conference titles and developed a sense of momentum that would carry into later decades.</p>
	<p>The late 20th and early 21st centuries brought LSU into a new era of national recognition. The team produced <strong>All-American athletes</strong> and future <strong>NFL standouts</strong>, earning a reputation as a reliable source of professional-level talent. Coaching leadership also played a crucial role, with several influential coaches guiding the Tigers through championship seasons, bowl victories, and periods of extraordinary competitive success.</p>
	<p>One of the most defining elements of the LSU football experience is the atmosphere surrounding night games in Tiger Stadium, often referred to as <em>Death Valley</em>. Fans describe the environment as electric, deafening, and transformative, with the roar of the crowd capable of shaking the stadium and unnerving visiting teams. These evenings, filled with school spirit and tradition, have become woven into the cultural fabric of both the university and the state of Louisiana.</p>
	<p>Off the field, the program has acted as a unifying force for alumni and residents across Louisiana. The call of "<strong>Geaux Tigers!</strong>" has grown into a symbol of collective pride, extending far beyond the campus and into national conversations about college football. The Tigers' colors of <em>purple and gold</em> are recognized throughout the country, representing not only the team's athletic legacy but also the deep-rooted identity of the LSU community.</p>
	<p>In addition to winning championships, LSU's forays into innovative offensive and defensive systems contributed to the broader evolution of the sport. The program has alternated between traditional power football and more modern, high-tempo offensive schemes, illustrating its ability to adapt to changing eras while still honoring its foundational identity.</p>
	<p>Throughout its history, LSU has cultivated rivalries that energize fans and remain central to the college football landscape. These matchups, built on decades of competition, have produced unforgettable moments, dramatic victories, and lasting memories for generations of supporters.</p>
	<p>Taken together, the history of the LSU Tigers football team is not simply a record of wins and losses. It is the story of a program shaped by culture, resilience, passion, and tradition — a program that continues to influence the sport, inspire its fans, and carry forward a legacy that stretches far beyond the field.</p>
	<hr />
	<p>From humble beginnings to nationally celebrated triumphs, the LSU Tigers football team remains a symbol of excellence and pride for Louisiana, standing as one of the most storied and enduring programs in all of college football.</p>
  </body>
</html>
Click on the "Show Exercise Code" above to show the code I used to complete the exercise.
Semantic Containers
Description
Semantic containers are elements that provide meaning to the structure of your document. They represent the role of the content inside of them. This helps developers understand the document structure which in turn improves maintainability, but semantic containers really help give screen readers and search engines context.
Semantic Container Elements
The following are the semantic container elements:
- header: The introduction. Typically, this might hold a logo, the navigation, or heading.
- footer: The conclusion. Typically, this might hold contact information, copyright details, etc.
- main: The main content.
- aside: This can represent a couple of different roles. Early on in HTML5 when this element was introduced, it was meant to represent sort of the tangent equivalent to a document. Today, it more than likely would represent content that is literally to the side of the main content.
- nav: Navigation content, think "menubar".
- article: Independent content that could be distributed on its own, outside the context of your webpage.
- section: Similar to article, only instead of being independent of the context, it relies on the context of its parent container.
Subjectivity
Semantics were only formally defined in HTML5 and are relatively new, this means that there is still a level of subjectivity associated with them.
For example, in my opinion, this would be perfectly valid semantic markup:
<main>
    <h1>Page Title</h1>
    <article>
        <section>
            <header>
                <h1>Section Title</h1>
                <h2>Section Subtitle</h2>
            </header>
            <p>E lorem ipsum...</p>
        </section>
        <section>
            <header>
                <h1>Second Section Title</h1>
                <h2>Second Section Subtitle</h2>
            </header>
            <p>E lorem ipsum...</p>
        </section>
    </article>
</main>
The divide behind this example is that I am using h1 elements inside each section. The original idea when HTML5 introduced semantic containers was that each would be its own self-contained outline so that an h1 element inside a semantic container would reprensent the highest heading of that container but not necessarily the page.
Unfortunately, the reality is that this idea was never fully implemented. In today's day and age when SEO reigns supreme, you should probably abide by their rules. This means that you should only have one h1 element per page and then the subsequent headings should form linearly rather than independently.
Refactoring the example above, it would probably look something like this:
<main>
    <h1>Page Title</h1>
    <article>
        <section>
            <header>
                <h2>Section Title</h2>
                <h3>Section Subtitle</h3>
            </header>
            <p>E lorem ipsum...</p>
        </section>
        <section>
            <header>
                <h2>Second Section Title</h2>
                <h3>Second Section Subtitle</h3>
            </header>
            <p>E lorem ipsum...</p>
        </section>
    </article>
</main>
Articles vs Sections
So when do you use an article over a section or vice-versa? Shoot, I barely know myself half the time.
In an ideal world, every HTML document we write will be extremely clear on what content is independent of the page and what isn't, but that isn't always the case.
You will need to use your judgement and if you're not sure, then reach out to other programmers. Forums like VBForums (opens in a new tab) are great for open-ended dialog like this.
Non-Semantic Containers
Description
Non-Semantic containers are elements that don't have any meaning to the structure of your document. Basically, they are generic containers used to group stuff together.
These elements were part of HTML long before semantic containers were introduced, but a general rule of thumb is that if you can use a semantic container, then use it rather than a non-semantic container.
Non-Semantic Container Elements
The following are the non-semantic container elements:
- div: Block-level container
- span: Inline container
Remember, these elements do not describe the type of content they contain, their meaning comes entirely from how you use them in CSS or JavaScript.
Example
<div class="card">
    <h2>Card Header</h2>
    <!-- date-created will be populated using JavaScript -->
    <h2>Created On <span class="date-created"></span></h2>
    <p>E lorem ipsum...</p>
</div>
Lists
Description
Lists are used to group related items together. There are two primary types of lists in HTML: ordered and unordered. Both types use list item elements to hold each entry.
Unordered Lists
Unordered lists display items with bullet points:
<ul>
    <li>1<sup>st</sup> Item</li>
    <li>2<sup>nd</sup> Item</li>
    <li>3<sup>nd</sup> Item</li>
</ul>
In this example, we define an unordered lists by using the ul element. Then each child is a list item, denoted by the li element. The child of the list item can be just about anything, but the immediate child of the unordered list must be a list item.
Ordered Lists
Ordered lists display items with numbers points:
<ol>
    <li>1<sup>st</sup> Item</li>
    <li>2<sup>nd</sup> Item</li>
    <li>3<sup>nd</sup> Item</li>
</ul>
Ordered lists follow the same rules as unordered lists, the only difference is that we use an ol element as opposed to a ul element.
Ordered List Attributes
The following list are attributes that can be applied to ol elements:
- start: Specifies what number the list starts at
- type: Specifies what kind of marker the list items use. The enumerated values are:
- 1: Numbers (default)
- a: Lowercase letters
- A: Uppercase letters
- i: Lowercase Roman numerals
- I: Uppercase Roman numerals
For example:
<ol start="100" type="I">
    <li>Clothes</li>
    <li>Bedding</li>
    <li>Toiletries</li>
</ol>
Nested Lists
Lists can be infinitely nested to create sublists, typically used to represent hierarchical data. For example:
<ol>
  <li>Pick The Camp</li>
  <li>Pack Your Bags
    <ul>
      <li>Clothes</li>
      <li>Bedding</li>
      <li>Toiletries</li>
    </ul>
  </li>
  <li>Confirm with Scout Master</li>
</ol>
Demo
Open the demo in a new tab
Show Demo Code
<ol type="A">
  <li>Pick The Camp</li>
  <li>Pack Your Bags</li>
    <ul>
      <li>Clothes</li>
      <li>Bedding</li>
      <li>Toiletries</li>
    </ul>
</ol>
<p>It is very important that you pack your bag correctly, otherwise you'll be screwed!</p>
<ol type="A" start="3">
  <li>Confirm with Scout Master</li>
</ol>
Click on the "Show Demo Code" above to show the code I used to create the demo.
Details
Description
The details element is an interactive element that shows only a title when collapsed but shows everything inside it when expanded. It lets you hide extra content behind a clickable summary element so users can choose whether they want to see more or not.
If you go back to the table of contents, you can see the details element in full use. Each lesson has a summary element in a "Chapter X. {name}" format, then when you expand the element you will see a list of the individual lessons for that chapter.
The best part about the details element? You get all this behavior without writing a single line of JavaScript. HTML provides us this nifty feature right out of the box.
Anatomy
A details element will typically consist of two parts:
- summary - This element represents the clickable heading that is always visible.
- details body - This is everything else inside the details element. The content does not strictly need to live in a groupping element, but I would definitely recommend it.
Example
Here is a basic example:
<details>
	<summary>Revelio</summary>
	<p>You're a wizard Harry.</p>
</details>
Default State
By default, a details element will be collapsed. If you want it to be expanded when the page loads, you can add the open attribute. For example:
<details open>
	<summary>Open Me</summary>
	<p>Just kidding, I'm already opened.</p>
</details>
Notice that in this attribute we don't give it a value. This attribute is sort of special because if it has any value at all, even something like open="false", the browser will always treat the presence of the open attribute as an indication that it should be expanded.
Grouping Details
Something really cool that the details element supports out of the box is that you can give multiple detail elements the same name, and this will cause them to be connected.
Basically, this means that only one of the detail elements that share the same name can be opened at any give time. In other words, opening one will cause the other to close.
For example:
<details name="group1">
	<summary>Title 1</summary>
	<p>Summary 1.</p>
</details>
<details name="group1" open>
	<summary>Title 2</summary>
	<p>Summary 2.</p>
</details>
<details name="group1">
	<summary>Title 3</summary>
	<p>Summary 3.</p>
</details>
This example will have Title 2 expanded, but when you open Title 1 or Title 3 then it will close Title 2 automatically.
Too Much Of Anything Is Unhealthy
Just because you can hide content doesn't mean you always should. Use your judgement when adding a details element.
A good example is if a user needs information to continue doing something then naturally it shouldn't be tucked away.
Demo
Open the demo in a new tab
End of Chapter Quiz
Questions
Question 1
Question 2
Question 3
Question 4
Question 5
Question 6
Question 7
Anchor Element
Description
The anchor element is one of the most important elements in all of HTML because it connects everything together through linking documents. Without links, the web as we know it would not exist.
The anchor element uses an attribute called href which is short for "hypertext reference" and the href tells the browser where the link should navigate to. Technically, the href attribute is optional, it's just that without the attribute the anchor would be pretty useless.
Here is an example of using an anchor element:
<a href="https://www.html-lessons.com/">HTML Lessons</a>In the example, the text "HTML Lessons" would be visible to the user but when clicked the browser would navigate to the URL in the href attribute.
Accessibility
I am going to quote directly from the Mozilla Developer Network, because they put it best.
“The content inside a link should indicate where the link goes, even out of context.
A sadly common mistake is to only link the words "click here" or "here"
...
Luckily, this is an easy fix, and it's actually shorter than the inaccessible version!
...
Assistive software has shortcuts to list all links on a page. However, strong link text benefits all users — the "list all links" shortcut emulates how sighted users quickly scan pages.”
Demo
Open the demo in a new tab
Relative vs Absolute
Description
When you make a link, its href attribute is like giving directions. You can give a full, detailed street address (an absolute URL) or just point down the hall (a relative URL). Both get the job done, but they're used for different trips.
Before we dive in, let's quickly take apart a web address to see what its made of.
The Anatomy Of A URL
Let's use this URL as our example: https://www.html-lessons.com/lessons.html#my-element?search=100
- Protocol (https://): The Protocol is the "language" the browser uses to talk to the server. https is the most common one today, and the 's' stands for "secure".
- FQDN (www.html-lessons.com): This is the equivalent of a website's main street address. It's made of a few smaller parts:
- Subdomain (www): A holdover from the early internet when different services had different addresses (like mail.website.com vs www.website.com). Over time, the www became the defacto subdomain for the main website.
- Domain (html-lessons): This is the unique name of the website.
- Top-Level Domain (.com): The .com, .org, .net, .etc at the end. Back in the day, this told users what kind of organization the website belonged to, but now not so much.
- Path (/lessons.html): If the domain tells us where the server is located, then the path tells us what file we need to get from the server.
- Query String (?search=100): The query string is optional and starts with a question mark. It passes extra info to the server, like a search term or a filter. Here, we're telling the server, "I'm searching for 100."
- Fragment (#my-element): The fragment is optional and starts with a pound sign. It doesn't actually talk to the server; it tells your browser, "Hey, once this page loads, scroll down to the element with the ID my-element." It's an instant jump-to link for a specific spot on a page.
- Fragments can be used in both CSS and JavaScript.
- In fact, HtmlLessons uses fragments in CSS to implement a SPA pattern.
- If you look at the URL, you'll notice that when the fragment changes, the page view changes too.
URL Types
An absolute URL is the full web address, much like example given above.
A relative URL is shorter and is written relative to the current page's location.
Relative paths are great when you are linking between pages on your own site because they keep things short and easier to move around. Absolute URLs are best when linking to external sites because you are very explicit in telling the browser where to go.
If you go back to the Anchor Element lesson and scroll down the bottom, you can see both relative and absolute paths being used. The buttons down at the bottom are actually anchors using relative paths where as the citation in the MDN quote uses an anchor with an absolute path.
Relative URL Traversal
You can use tree traversal in relative paths to access files more easily. For example, take the following file structure:
.
├── FolderA/
│   ├── File1.html
│   ├── File2.html
│   └── File3.html
├── FolderB/
│   ├── Folder1/
│   │   ├── File4.html
│   │   └── File5.html
│   └── Folder2/
│       ├── File6.html
│       └── File7.html
└── FolderC/
    ├── FolderI/
    │   └── File8.html
    └── FolderII/
        ├── File9.html
        └── File10.html
If we were on page ./FolderC/FolderII/File9.html, here are some ways in which we could access other files:
<!--
     if it is just the filename, then
     it will pull from the same folder
     in this case, the anchor will bring us to:
     ./FolderC/FolderII/File10.html
-->
<a href="File10.html"></a>

<!--
     starting with "/" brings us to the root
     the root in this case is the directory
     that holds FolderA, FolderB, and FolderC
     in this case, the anchor will bring us to:
     ./FolderB/Folder2/File7.html
-->
<a href="/FolderB/Folder2/File7.html"></a>

<!--
     starting with ".." will bring us to the directory above the directory we're in
     the dots can be chained, e.g. ../../../etc...
     in this case, the anchor will bring us to ./FolderB/Folder1/File4.html
-->
<a href="../../FolderB/Folder1/File4.html"></a>
Fragment Identifiers
Description
Sometimes you do not want to link to a completely different page, you just want to jump to a specific spot within the same page. This is where fragment identifiers come in.
A fragment identifier uses the # symbol followed by an identifier that matches an element's id attribute.
Example
This is an example of using a fragment identifier:
<a href="#my-element>Go To My Element</a>
<p>A bunch of text, blah blah blah, imagine this goes outside the viewing area of the user.</p>
<h2 id="my-element">My Element!.</h2>
Fragment identifiers are super helpful for creating things like tables of contents, "back to top" links, and even deep linking into specific sections of long documents.
One last note: only id attributes work here. Classes and other attribute won't work here.
Demo
Open the demo in a new tab
Anchor Prefixes
Description
Anchors can do more than just link websites or jumping to elements. By using certain prefixes in the href, you can tell the browser how to handle the link in special ways.
Use the mailto prefix to open the user's default email program with a new message:
<a href="mailto:person@email.com">Send Email</a>By combining the mailto prefix with query string parameters, you can even set the subject or body of the email:
<a href="mailto:person@email.com?subject=David%20Is%20Great&body=Well%20of%20course!">Send Email</a>This example would open up an email and have the subject line filled out with "David Is Great" and the body filled out with "Well of course!"
URL Encoding
Notice in the code that the spaces in the query string parameter have been replaced with %20. This is because some characters, like spaces, cannot be included in a URL without breaking it. To overcome this issue, the URL is encoded so that special characters get replaced with their ASCII hexadecimal value.
Instead of trying to memorize encoded characters, I would recommend searching for "url encoder" and running any links through it if you have URLs with special characters.
Phone
Use the tel prefix to open the user's default phone program to dial a phone number. With the rise of mobile usage, this prefix is especially useful.
<a href="tel:+12128675309">Jenny?</a>Notice that the phone number is formatted kind of wonky, this is because you want to be as specific as possible since you have no control over how the browser will handle the phone number.
Typically, you will want to follow this format:
- Trunk Prefix (+): Wikipedia's Trunk Prefix (opens in a new tab) has great information. The + sign is the international shorthand.
- Country Code: Wikipedia's list of telephone country codes (opens in a new tab) has great information. 1 is for US and Canada (and some others).
- Phone Number: This will vary country by country. But everybody know's Jenny's number.
Image Elements
Description
The image element lets you display pictures in your webpage. This is also one of those few elements that use a self-closing tag.
The image element will typically use the src attribute to specify where the image lives.
Example
<img src="logo.jpeg" />Just remember to use the same absolute/relative pattern that we used in the Absolute vs Relative lesson.
Alt Attribute
Every image should also include an alt attribute. This text is used by screen readers for accessibility, and it is also displayed when the image cannot load.
Remember that not everybody using your website can see well and might rely on assistive technology. Try putting yourselves in their shoes and think about how frustrating it must be to visit a website and miss out on half context because someone forgot a single attribute.
This is an example of setting the alt attribute:
<!--
     "Website Logo" would be displayed for screen readers
     or if the image isn't found
-->
<img src="logo.jpeg" alt="Website Logo" />
Caveat
There is a caveat with the alt attribute. Sometimes, people will create a website title where its an image onside of the website's name. In this situation, it actually makes more sense to put the image inside of the heading element, still add the alt attribute, but keep the value empty. For example:
<h1>
  <img src="logo.jpeg" alt="" />
  My Website
</h1>
I don't know the exact reason why this is preferable, but it is.
My guess is that if a screen reader were to read this then the context of the image is known by the heading.
Sizing
You can set the size of an image using the height and width attributes, for example:
<img src="logo.jpeg" alt="Website Logo" height="32" width="64" />The values are represented in pixels, so in the example above, the image would be scaled to 32 pixels tall by 64 pixels wide.
While this was more common practice a long time ago, today CSS is typically used to style the images.
Figures
Description
They say a picture is worth a thousand words, well sometimes we want to add a few more words to our images.
Use both the figure and figcaption elements to provide users with an image and a caption explaining what the image is about.
Example

In this example, the figure element wraps everything together. The figcaption provides a description or label that goes along with the image.
Figures
Bruh, what figures?!.
Figures provide semantic meaning so that search engines and assistive technologies understand that the image and caption both belong together.
Figures are not limited to just images either. You can use the figure element to group any visual media, though since these lessons are designed with beginners in mind, I'll leave those out.
Figcaption
The figcaption element can appear either before or after the image inside the figure, both cases are completely valid.
<figure>
    <figcaption>David Day - Chess Grandmaster Wannabe.</figcaption>
    <img src="profile.jpeg" alt="David's profile picture" />
</figure>
Demo
Open the demo in a new tab
Exercise
Description
I think this is a good point to try out what you've learned so far.
I encourage to you do the following exercise. Reference the previous lessons if you need, but I would highly encourage you to type out the code instead of just doing a rote copy/paste.
- Create an HTML file with a document
- This should have all the proper markup
- Lang attribute, title, head elements, etc.
- Create a Resumé
- Structure the heading elements properly
- Include a profile picture
Example
Open the example in a new tab
Solution
Show Demo Code
<!DOCTYPE html>
<html lang="en">
    <head>
        <title>My First Code</title>
        <meta charset="UTF-8" />
        <meta name="viewport" content="width=device-width, initial-scale=1.0" />
        <meta name="author" content="David Day." />
    </head>
    <body>
        <h1>David Day's Resumé</h1>
        <h2>Software Developer</h2>
        <img src="resources/profile.png" alt="David Day's profile picture" height="170" width="170" />
        <main>
            <article>
                <h3>Work History</h3>
                <section>
                    <h4>Senior Software Developer</h4>
                    <h5>Company A - <em>1/1/2020 - Present</em></h5>
                    <p>Currently working for Company A as a senior software developer. Many of my tasks include:</p>
                    <ul>
                        <li>Writing code</li>
                        <li>Debugging</li>
                        <li>Deploying</li>
                        <li>Reviewing</li>
                    </ul>
                </section>
                <section>
                    <h4>Intermediate Software Developer</h4>
                    <h5>Company B - <em>1/1/2015 - 1/1/2020</em></h5>
                    <p>Worked for Company B as an intermediate software developer. Many of my tasks included:</p>
                    <ul>
                        <li>Writing code</li>
                        <li>Debugging</li>
                    </ul>
                    <p>I was given the opportunity to lead some small projects.</p>
                </section>
            </article>
            <article>
                <h3>References</h3>
                <section>
                    <h4>Professional References</h4>
                    <ol>
                        <li>Beau Thibodaux</li>
                        <li>Brent Dufrene</li>
                        <li>Angie Boudreaux</li>
                    </ol>
                </section>
                <section>
                    <h4>Personal References</h4>
                    <ol>
                        <li>My Mom</li>
                        <li>My Wife (maybe not today, try tomorrow)</li>
                    </ol>
                </section>
            </article>
        </main>
    </body>
</html>
Click on the "Show Demo Code" above to show the code I used to create the demo.
Table Structure
Rant
Before I go into this lesson, I want to stand on my soap box and preach a bit. Tables are meant to show tabular data, they are not meant to style your website.
Remember, that the 1990s was the wild wild west of web development. CSS was in its infancy and support was mixed across browsers. One of the only reliable ways to get your website to "flow" correctly back then was to use tables.
The problem today is that we live in a day and age where half of all websites are being viewed from a mobile device and many people rely on assistive technology to use websites. Using tables to style your website will break both of these.
I previously worked at a software consulting firm for many years. The chief architect is an absolute brilliant person, probably the smartest guy I know, but when I first started there, it would not be uncommon for him to revert to what he originally learned and to use tables to style a webpage or feature. He started doing it less and less, but it just goes to show you that even the smartest developers still use bad practices.
/rant
Description
Tables in HTML are used to display tabular data using the table element as the container.
There are several parts that make up a table and we will be going over them in the next couple of chapters, but here is a very simple table example:
<table>
    <tr>
        <td>Row 1, Cell 1</td>
        <td>Row 1, Cell 2</td>
    </tr>
    <tr>
        <td>Row 2, Cell 1</td>
        <td>Row 2, Cell 2</td>
    </tr>
</table>
Breaking down the example:
- The table element is the container.
- The table row (tr) elements group the cells.
- The table data (td) elements represent the individual cell.
Demo
Open the demo in a new tab
Rows
Description
Rows are created in a table using the tr element, which stands for table row.
Example
<table>
    <tr>
        <td>Row 1, Cell 1</td>
        <td>Row 1, Cell 2</td>
    </tr>
    <tr>
        <td>Row 2, Cell 1</td>
        <td>Row 2, Cell 2</td>
    </tr>
    <!-- etc... -->
</table>
Nesting Cells Inside Rows
Every cell must live inside of a tr element, they cannot go directly inside the table element itself.
Because HTML is a forgiving language, putting a cell directly in the table will not throw an error, but it will cause unexpected results.
Empty Rows
It is perfectly legit to have an empty row without any cells, for example:
<tr></tr>But typically, empty rows do not serve any purpose.
If you find yourself adding an empty row just for styling, then stop, that is a bad practice.
Table Header
Description
Tables often need headers to describe what each column or row represents. This is where the th element comes in, which stands for table header.
Example
<table>
    <tr>
        <th>ID</th> <!-- th here -->
        <th>Name</th> <!-- and here -->
    </tr>
    <tr>
        <td>1</td>
        <td>David Day</td>
    </tr>
    <tr>
        <td>2</td>
        <td>Brent Boudreaux</td>
    </tr>
    <!-- etc... -->
</table>
Table Head
While this is perfectly valid, typically you will want to put the header columns in their own section of the table. A thead element is used to group rows with th elements.
For example:
<table>
    <thead> <!-- thead holds the th rows -->
        <tr>
            <th>ID</th>
            <th>Name</th>
        </tr>
    </thead>
    <tr>
        <td>1</td>
        <td>David Day</td>
    </tr>
    <tr>
        <td>2</td>
        <td>Brent Boudreaux</td>
    </tr>
    <!-- etc... -->
</table>
Because HTML is a forgiving language, I personally try to be as explicit as possible so that the browser has little room for guess work.
This is why I would recommend using the thead element.
Table Body
Description
Much like the table header groups rows of header data, the table body (tbody) element groups together the main rows of data inside the table.
Adding a tbody element will not change how the table looks, but it does provide semantic grouping.
Example
<table>
    <thead>
        <tr>
            <th>ID</th>
            <th>Name</th>
        </tr>
    </thead>
    <tbody> <!-- tbody holds the td rows -->
        <tr>
            <td>1</td>
            <td>David Day</td>
        </tr>
        <tr>
            <td>2</td>
            <td>Brent Boudreaux</td>
        </tr>
        <!-- etc... -->
    </tbody>
</table>
In this example, the tbody contains the actual data rows. Take a step back for a second and imagine that you have been tasked with maintaining existing HTML code. Doesn't this example make it much easier to just glance at the table and figure out which data represents the header and which data represents the content?
As I mentioned in the Table Header lesson, it is important to try and be as explicit as possible when setting up your tables.
Table Footer
Description
We have already covered the table header and table body, logically the last part of the table would be the table footer (tfoot) element.
Example
<table>
    <thead>
        <tr>
            <th>ID</th>
            <th>Name</th>
            <th>Age</th>
        </tr>
    </thead>
    <tbody>
        <tr>
            <td>1</td>
            <td>David Day</td>
            <td>99</td>
        </tr>
        <tr>
            <td>2</td>
            <td>Brent Boudreaux</td>
            <td>22</td>
        </tr>
        <!-- etc... -->
    </tbody>
    <tfoot> <!-- tfoot holds the footer td rows -->
        <tr>
            <td></td>
            <td></td>
            <td>Avg: 60.5</td>
        </tr>
    </tfoot>
</table>
I'm not going to beat a dead horse (crazy figure of speach by the way). You should already know why the tfoot element is important. I'm just simply closing the loop.
Demo
Open the demo in a new tab
Additional Features
Description
Up to now, you have seen the basic building blocks of tables. But tables also have a few extra features that make them more flexible. These aren't things you'll use all the time, but it's good to know they exist.
Column and Row Spans
Sometimes one cell needs to stretch across multiple columns and/or rows. That's where the colspan and rowspan attributes come into play. They tell the browser that a cell should take up a specific number of columns/rows.
Both attributes accept a positive number greater than 0 and the sum of all colspan/rowspan should equal the total sum of columns/rows in a table.
But remember, HTML is a very forgiving language. If you put a negative number or the value exceeds the sum of the columns/rows, it won't throw an error, but it might look bad.
For example:
<table>
    <thead>
        <tr>
            <th>ID</th>
            <th>Name</th>
            <th>Age</th>
        </tr>
    </thead>
    <tbody>
        <tr>
            <td rowspan="2">-</td> <!-- This would span both rows -->
            <td>David Day</td>
            <td>99</td>
        </tr>
        <tr>
            <td>Brent Boudreaux</td>
            <td>22</td>
        </tr>
    </tbody>
    <tfoot>
        <tr>
            <td colspan="2"></td> <!-- this would span both columns -->
            <td>Avg: 60.5</td>
        </tr>
    </tfoot>
</table>
Caption
Tables can also have a caption element. Think of it like a built-in title. It always sits at the very top of the table, even before the header.
Captions are a nice way to label your data without needing an extra heading element outside the table and they play well with assistive technologies.
Example
<table>
    <caption>HtmlLessons Example</caption> <!-- the table's caption -->
    <thead>
        <tr>
            <th>ID</th>
            <th>Name</th>
            <th>Age</th>
        </tr>
    </thead>
    <tbody>
        <tr>
            <td rowspan="2">-</td>
            <td>David Day</td>
            <td>99</td>
        </tr>
        <tr>
            <td>Brent Boudreaux</td>
            <td>22</td>
        </tr>
        <!-- etc... -->
    </tbody>
    <tfoot>
        <tr>
            <td colspan="2"></td>
            <td>Avg: 60.5</td>
        </tr>
    </tfoot>
</table>
Open the demo in a new tab
Deprecated Attributes
Remember how I said that the wild wild west of the 1990s used tables to format webpages? Well tables also used to have several attributes that provided formatting. You still might see them out there in the wild, but they are considered outdated and shouldn't be used today.
This is a list of deprecated attributes:
- align
- bgcolor
- border
- cellpadding
- cellspacing
- frame
- rules
- summary
- width
Today we would use CSS to style/format tables and their data.
Exercise
Description
We're here again. Time for you to do your homework. Stop me if you've heard me say this before, but...
I encourage to you do the following exercise. Reference the previous lessons if you need, but I would highly encourage you to type out the code instead of just doing a rote copy/paste.
- Create an HTML file with a document
- This should have all the proper markup
- Lang attribute, title, head elements, etc.
- Create a table representing inventory in a warehouse.
- Be sure to include the following:
- A caption
- Header Row
- ID
- Name
- Quantity
- Cost
- Data (duh)
- Footer Row
- Should include aggregate data. E.g., counts, average, etc.
- Align the aggregates to be under their respective column
Pro Tip: Mockaroo (opens in a new tab) is a great resource for generating mock data.
Demo
Open the demo in a new tab
Solution
Show Demo Code
<table>
    <caption>Warehouse Inventory</caption>
    <thead>
        <tr>
            <th>ID</th>
            <th>Name</th>
            <th>Quantity</th>
            <th>Cost</th>
        </tr>
    </thead>
    <tbody>
        <tr>
            <td>1</td>
            <td>Honey BBQ Ribs</td>
            <td>22</td>
            <td>$19.74</td>
        </tr>
        <tr>
            <td>2</td>
            <td>Maple Pecan Pancake Mix</td>
            <td>8</td>
            <td>$56.24</td>
        </tr>
        <tr>
            <td>3</td>
            <td>Lemon Sorbet</td>
            <td>7</td>
            <td>$46.50</td>
        </tr>
        <tr>
            <td>4</td>
            <td>Aeropress Coffee Maker</td>
            <td>22</td>
            <td>$53.17</td>
        </tr>
        <tr>
            <td>5</td>
            <td>Raspberry Vanilla Greek Yogurt</td>
            <td>18</td>
            <td>$31.73</td>
        </tr>
        <tr>
            <td>6</td>
            <td>Savory Trail Mix</td>
            <td>6</td>
            <td>$54.57</td>
        </tr>
        <tr>
            <td>7</td>
            <td>Maple Pecan Oatmeal Cookies</td>
            <td>25</td>
            <td>$34.19</td>
        </tr>
        <tr>
            <td>8</td>
            <td>Smart Air Purifier</td>
            <td>15</td>
            <td>$31.16</td>
        </tr>
        <tr>
            <td>9</td>
            <td>Classic Vanilla Fudge</td>
            <td>10</td>
            <td>$34.61</td>
        </tr>
        <tr>
            <td>10</td>
            <td>Maple Almond Butter</td>
            <td>22</td>
            <td>$48.38</td>
        </tr>
    </tbody>
    <tfoot>
        <tr>
            <td colspan="2"></td>
            <td>Sum: 155</td>
            <td>Avg: $41.03</td>
        </tr>
    </tfoot>
</table>
Click on the "Show Demo Code" above to show the code I used to create the demo.
Form Element
Description
Forms are how we collect information from users. For example, logging into your social media account requires you to enter a username and password into a form. Making a post from your social media account requires you to type out your rant into a form. The web is filled (pun intended) with forms!
The form element is the container that holds all of the inputs, labels, and buttons. Without a form, you can still create inputs, but they won't have any way of being grouped or submitted.
Example
The following is an extremely simple example of a form:
<form>
    <input />
    <button>Submit</button>
</form>
Attributes
The form element has a few attributes that tell the server processing the form how to handle the data:
- action: this tells the form where to send the information to when submitted.
- If you omit the action, it will do what's called a postback request.
- A postback is basically submitting the form to the same page.
- method: this tells the form how the data should be sent. The acceptable values are:
- get (default)
- post
- dialog
- enctype: this tells the form how the data should be encoded. The acceptable values are:
- application/x-www-form-urlencoded (default)
- multipart/form-data
- text/plain
Stay In Your Lane
What in the world is a server and why am I talking about it?
Don't worry so much about learning how these attributes work or sending data to a server.
Forms are used in tandem with a server-side programming language, like PHP or NodeJS, which we do not cover in these lessons. For now, just know that forms are used to send data and focus on building the forms to capture the information.
Inputs
Description
The input element is just one way in which you can actually capture user data. Even though it's just a single element, it is surprisingly flexible in how it's used.
Example
The following is an extremely simple example of an input:
<input />Notice that the input element is self-closing, this means that you do not need to include a closing tag.
Different Types
Setting the type attribute changes what the input does. These are some of the different types:
- text (default): basic textbox
- checkbox: toggleable checkbox
- color: color picker in supporting browsers
- date: date picker (year, month, and day, with no time) in supporting browsers
- datetime-local: date and time picker (with no time zone) in supporting browsers
- email: basic textbox, but adds validation
- file: file picker in supported browsers, typically rendered with a button
- hidden: literally an invisible control
- month: date picker (year and month only)
- number: basic textbox, but adds validation
- password: basic textbox, but obscures text
- radio: radio button, i.e. allows a single value to be selected out of multiple choices
- range: slider to allow selection between a min/max
- tel: basic textbox
- time: time-only picker (with no time zone)
- week: date picker (year and week number only)
The type attribute is important because of how the inputs are rendered on specific devices.
Have you ever gone to a website on your phone that asked you for your phone number only to have the entire keyboard come up instead of just the telephone keypad? This is because the attribute was left out or set incorrectly.
Since text is the default type attribute value, lazy developers simply won't give inputs a type. Don't be "that guy". Do the right thing and always give your inputs the correct type, your users will thank you for it.
For example:
<!-- compare this on a mobile device -->
<input type="text" />

<!-- versus this -->
<input type="email" />
Attributes
Input elements have a bunch of attribute. The MDN is a good reference if you want to know them all: MDN input attributes (opens in a new tab)
Here are just a few of the more commonly used ones:
- name: unlike id or class, name is how a form identifies an input
- value: the default value of the input
- placeholder: the "ghost" text that shows up inside the textbox until you type
- required: tells the form that the value is required
- maxlength: tells the form that the input cannot exceed a specific character length
- disabled: indicates if the input is editable or disabled
Example
<input type="text" name="FirstName" required="required" />
<input type="text" name="MiddleName" />
<input type="text" name="LastName" required="required" />
<input type="tel" name="PhoneNumber" />
<input type="email" name="EmailAddress" required="required" />
Select
Description
The select element gives users the ability to pick a value (or multiple values) from a range of options.
More often than not, a select element will be an interactive dropdown list. That is to say you click on it and the options appear under it and then selecting an option will set the value.
Options
The select element is very limited in what child elements it can contain. One of the child elements is the option element.
The option element represents the selectable item that appear when the select element is opened.
For example:
<select>
	<option>Alligator</option>
	<option>Bearded Dragon</option>
	<option>Cat</option>
	<option>Dog</option>
	<option>Lizard</option>
	<option>Squirrel</option>
</select>
Option Value
The option element can optionally specify the value it represents via the value attribute. By default, if there is no value attribute then the value will be whatever the text content of the option element is.
This is particularly useful when showing lookups from a database. More often than not, a lookup will represent a key/value combination where the key is used by software and the value is displayed to users.
For example:
<select>
	<option value="1">System Administrator</option>
	<option value="2">Admin</option>
	<option value="3">Manager</option>
	<option value="4">User</option>
</select>
Option Groups
The optgroup element can be used to group option element together. Provide a label attribute and then any grouped options will be children under the optgroup element.
For example:
<select>
	<optgroup label="Mammals">
		<option>Cat</option>
		<option>Dog</option>
		<option>Squirrel</option>
	</optgroup>
	<optgroup label="Reptiles">
		<option>Alligator</option>
		<option>Bearded Dragon</option>
		<option>Lizard</option>
	</optgroup>
</select>
Attributes
There are several attributes that can be applied to the select element, but there are two in particular that change the default behavior: multiple and size.
Multiple Attribute
The multiple attribute is similar to the open attribute we discussed in the Details lesson. If it on the select element, regardless of its value, it will always be applied.
By setting the multiple attribute, you are indicating that the user can select multiple values from the select element by holding their mouse down or by using the Ctrl, Command, or Shift keys.
Here is an example of setting the multiple attribute:
<select multiple>
	<optgroup label="Mammals">
		<option>Cat</option>
		<option>Dog</option>
		<option>Squirrel</option>
	</optgroup>
	<optgroup label="Reptiles">
		<option>Alligator</option>
		<option>Bearded Dragon</option>
		<option>Lizard</option>
	</optgroup>
</select>
Size Attribute
The size attribute dictates how many items the select element should display.
If you tested the multiple attribute example above, you may have noticed that the select element actually went from being one line tall to being around 4 lines tall (depending on the browser).
By setting the size attribute, we can modify this default behavior and the multiple attribute does not need to be applied for the size attribute to be relevant.
For example, here is an examlpe of setting the size attribute on a single-selection select element:
<select size="3">
	<option>Option 1</option>
	<option>Option 2</option>
	<option>Option 3</option>
	<option>Option 4</option>
	<option>Option 5</option>
</select>
And here is an example of setting the size on a multi-selection select element:
<select multiple size="3">
	<option>Option 1</option>
	<option>Option 2</option>
	<option>Option 3</option>
	<option>Option 4</option>
	<option>Option 5</option>
</select>
There are a couple of things to remember when specifying the size:
- The size represents the number of items it should display, this also takes into account optgroups.
- So if you have a select with an optgroup, 5 elements in the optgroup, but you set the size attribute to 5, then the last item will be overflowed
- This is because it would show the optgroup's label
- Setting a size of 1 on a multiple select will change the behavior
- The new behavior will be browser dependent
- Most will show a line that says "N selected"
- Then when the select is opened, it will show a checkbox next to the options showing which are selected.
Demo
Open the demo in a new tab
Solution
Show Demo Code
<h1>Select Demo</h1>

<section>
	<h2>Default Select</h2>
	<select>
		<option>Alligator</option>
		<option>Bearded Dragon</option>
		<option>Cat</option>
		<option>Dog</option>
		<option>Lizard</option>
		<option>Squirrel</option>
	</select>
</section>

<section>
	<h2>Select With Value</h2>
	<select>
		<option value="1">System Administrator</option>
		<option value="2">Admin</option>
		<option value="3">Manager</option>
		<option value="4">User</option>
	</select>
</section>

<section>
	<h2>Select With Optgroup</h2>
	<select>
		<optgroup label="A">
			<option value="AL">Alabama</option>
			<option value="AK">Alaska</option>
			<option value="AZ">Arizona</option>
			<option value="AR">Arkansas</option>
		</optgroup>
		<optgroup label="C">
			<option value="CA">California</option>
			<option value="CO">Colorado</option>
			<option value="CT">Connecticut</option>
		</optgroup>
		<optgroup label="D">
			<option value="DE">Delaware</option>
			<option value="DC">District Of Columbia</option>
		</optgroup>
		<option value="FL">Florida</option>
		<option value="GA">Georgia</option>
		<option value="HI">Hawaii</option>
		<optgroup label="I">
			<option value="ID">Idaho</option>
			<option value="IL">Illinois</option>
			<option value="IN">Indiana</option>
			<option value="IA">Iowa</option>
		</optgroup>
		<optgroup label="K">
			<option value="KS">Kansas</option>
			<option value="KY">Kentucky</option>
		</optgroup>
			<option value="LA">Louisiana</option>
		<optgroup label="M">
			<option value="ME">Maine</option>
			<option value="MD">Maryland</option>
			<option value="MA">Massachusetts</option>
			<option value="MI">Michigan</option>
			<option value="MN">Minnesota</option>
			<option value="MS">Mississippi</option>
			<option value="MO">Missouri</option>
			<option value="MT">Montana</option>
		</optgroup>
		<optgroup label="N">
			<option value="NE">Nebraska</option>
			<option value="NV">Nevada</option>
			<option value="NH">New Hampshire</option>
			<option value="NJ">New Jersey</option>
			<option value="NM">New Mexico</option>
			<option value="NY">New York</option>
			<option value="NC">North Carolina</option>
			<option value="ND">North Dakota</option>
		</optgroup>
		<optgroup label="O">
			<option value="OH">Ohio</option>
			<option value="OK">Oklahoma</option>
			<option value="OR">Oregon</option>
		</optgroup>
		<option value="PA">Pennsylvania</option>
		<option value="RI">Rhode Island</option>
		<optgroup label="S">
			<option value="SC">South Carolina</option>
			<option value="SD">South Dakota</option>
		</optgroup>
		<optgroup label="T">
			<option value="TN">Tennessee</option>
			<option value="TX">Texas</option>
		</optgroup>
		<option value="UT">Utah</option>
		<optgroup label="V">
			<option value="VT">Vermont</option>
			<option value="VA">Virginia</option>
		</optgroup>
		<optgroup label="W">
			<option value="WA">Washington</option>
			<option value="WV">West Virginia</option>
			<option value="WI">Wisconsin</option>
			<option value="WY">Wyoming</option>
		</optgroup>
		<optgroup label="Territories">
			<option value="AS">American Samoa</option>
			<option value="GU">Guam</option>
			<option value="MP">Northern Mariana Islands</option>
			<option value="PR">Puerto Rico</option>
			<option value="UM">United States Minor Outlying Islands</option>
			<option value="VI">Virgin Islands</option>
		</optgroup>
	</select>
</section>

<section>
	<h2>Default Multiple</h2>
	<select multiple>
		<option>Item 1</option>
		<option>Item 2</option>
		<option>Item 3</option>
		<option>Item 4</option>
		<option>Item 5</option>
		<option>Item 6</option>
		<option>Item 7</option>
	</select>
</section>

<section>
	<h2>Multiple With Larger Size</h2>
	<select multiple size="7">
		<optgroup label="Small">
			<option>Item 1</option>
			<option>Item 2</option>
			<option>Item 3</option>
		</optgroup>
		<optgroup label="Medium">
			<option>Item 4</option>
			<option>Item 5</option>
			<option>Item 6</option>
		</optgroup>
		<optgroup label="Large">
			<option>Item 7</option>
			<option>Item 8</option>
		</optgroup>
	</select>
</section>

<section>
	<h2>Multiple With Size = 1</h2>
	<select multiple size="1">
		<optgroup label="Small">
			<option>Item 1</option>
			<option>Item 2</option>
			<option>Item 3</option>
		</optgroup>
		<optgroup label="Medium">
			<option>Item 4</option>
			<option>Item 5</option>
			<option>Item 6</option>
		</optgroup>
		<optgroup label="Large">
			<option>Item 7</option>
			<option>Item 8</option>
		</optgroup>
	</select>
</section>
Click on the "Show Demo Code" above to show the code I used to create the demo.
Labels
Description
Input elements are kind of meaningless without a label. Label elements connect with input elements to let users know exactly what they're entering.
Example
The following is an extremely simple example of using a label:
<label>My Field</label>For Attribute
Label elements can be tied to an input, not just visually, but in code as well. This is done by setting the for attribute of a label to match the input's id.
For example:
<label for="my-field">My Field</label>
<input type="text" id="my-field">
Remember how I said that HTML is a forgiving language? This is why it is so important to write good code. Technically an HTML document will allow you to have elements that have the same id, but this is a perfect example of where unexpected behavior might happen if you do.
For example, how does the browser know which input the label belongs to?
<label for="my-field">My Field</label>
<input type="text" id="my-field">

<!-- a bunch of other labels/inputs -->

<label for="my-field">My Field</label>
<input type="text" id="my-last-field">
In all likelihood, the last label in the example above was a copy/paste error or typo. But can you see how difficult this would be to catch since no error would be thrown?
Importance of Labels
Labels aren't just nice for users who can see the page without any issues; they're also important for accessibility. Screen readers rely on labels to tell someone what each input is for.
Also, when labels are linked to inputs using the for attribute, the give users a bigger area to click/tap. For example, imagine trying to tap on a tiny checkbox on a phone: when labels are linked to inputs, users can just tap on the label and it will toggle the checkbox.
Buttons
Description
Buttons are how users actually submit a form or trigger an action.
You've probably clicked more buttons on the web than you can count, Lord knows I've pushed my wife's buttons enough times, but in HTML they're actually super simple to build.
Button Element
The best way to create a button is with the button element.
For example:
<form>
    <button>Submit</button>
</form>
By default, a button inside a form will submit the form. But you can change how it behaves with the type attribute.
You may be thinking to yourself "isn't the button element the only way to create a button?" Well, you would be wrong. Technically, you could use an input element with the type set to button or image, but in all honesty, these are legacy holdovers from IE.
I won't be going over other ways to create a button in these lessons because, thank goodness, we almost never have to deal with IE anymore.
Buttons Types
There are several types of buttons that are set via the "type" attribute, they are:
- submit (default): submits the form
- reset: clears the inputs back to their defaults
- button: implictly does nothing, typically wired up with JavaScript
Example
<form>
    <button type="button">Do Something</button>

    <div>
        <label for="my-field">My Field</label>
        <input type="text" id="my-field">
    </div>

    <div>
        <button type="reset">Reset</button>
        <button type="submit">Submit</button>
    </div>
</form>
Demo
Open the demo in a new tab
Form Validation
Description
Form validation is about making sure users enter the right kind of information before a form gets submitted.
When working with a server-side language, it is best never to rely on data coming in from the client (in our case the browser) since client data in the browser can be manipulated so easily.
But for honest people and not bad actors, form validation provides users with a better overall experience.
Required
The required attribute makes sure an input can't be left empty.
<form>
    <input required />
    <!-- or -->
    <input required="required" />
</form>
Some attributes do not require a value, like the required attribute. Personally, I don't have strong opinions on which style you should use, just be consistent in whatever style you go with.
Type
We have already discussed why it is important from a user experience perspective to set the type attribute, but some types cause the browser to not allow you to submit the form until the value is correct.
Pattern
This is a much more advanced attribute. It allows you to use RegEx (opens in a new tab) to match specific formats.
I will not delve into RegEx, but here is a simple example that validates something like a postal code:
<form>
    <input pattern="d{5}" />
</form>
Keep in mind that some types do not honor the pattern attribute, these would be ones that do validation themselves like email and tel.
The Forgiving Language
You've never once heard me say this, but HTML is a forgiving language.
Form validation is no different. Different browsers may phrase the error messages differently, and some checks are looser or stricter than you might expect.
The important thing to remember is that built-in validation is a quick way to prevent obvious mistakes and to provide a nicer user experience.
Congratulations!

First off, I would like to say congratulations on completing every lesson. By this point you should have developed solid fundamentals that will make you a successfull programmer.
Now comes the big question: what should you do next?
Personally, I would recommend learning CSS and then JavaScript. CSS makes your website look pretty and JavaScript allows users to interact with it.
You can find my CSS lesson website at https://css-lessons.dev (opens in a new tab). I haven't written a JavaScript series yet, but there is one in the works.
If you would like to start a different programming language, I do have a tutorial on Visual Basic .NET in the same style as this website. You can find that here: https://www.vblessons.com/
Remember, programming is a "use it or lose it" skill. If you do not keep programming, as time goes by you will start to lose your edge. Whatever you decide to do going forward, I encourage you to continue programming and nevery shy away from asking for help.
In closing, if you are looking for a community to join full of nerds like myself, come on over to VBForums (opens in a new tab). I go by the handle dday9 and I hope to see you soon!